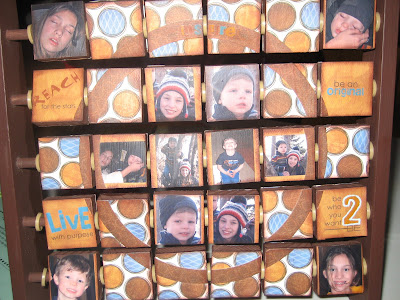


After many requests and a lecture from Cathy at The Playground about updating my blog :) here are pictures and instructions for the alphabet flipper I made. I used the TLC Urban Threadz line of paper and rub-ons.

This project was inspired by KreativeKarma on Two Peas, also a TLC consultant.
I started out with one of these flip and play toys. If you don't have one you can find them on ebay under alphabet flip. I took it apart and painted everything brown except the faces of the blocks, it took several coats. I layed out and bunched together all the blocks on the table and measured how large I needed the actual layout to be. I created the layout and used my paper trimmer to cut it into the small squares to attach to the blocks. I then attached the layout layer by layer to the blocks using Modge Podge. Next, I layed the completed blocks out in layout form to embellish. I trimmed off the excess paper on the sides. (Do not sand, it takes off the paint) I then inked with brown ink and finished it with Modge Podge.
This is the hard part.
Flip each of the blocks up to show the backs and bunch them back together to create the layout on the back. I had to keep checking to make sure I had everything flipped the right way so that all my blocks would be the same direction when they were flipped after I reattached them to the toy. Create your layout on the back the same way as the front. It might not be a bad idea to attach the backside of your blocks with removable adhesive the first time, flip all the blocks the same direction, as you would if they were on the toy, and make sure all the other sides of the blocks are the same direction before using the Modge Podge to attach. You don't just flip the whole layout upside down like you might expect.
Remember to be careful with how you layout the pictures, you don't want a face cut in half. The last picture above show the back side of my blocks. I managed to get my children's faces entirely on one block. It took me quite a while to find a picture that would do this.
I embellished the sides and the top of the toy with rub-ons then coated it with Modge Podge before putting it back together.
If I did another one of these, I think I would create a grid of the blocks on 2 transparencies, lay them over my layout for placement, then cut the transparency along with the layout for perfect placement.
I took this project with me the Scrapfest Midwest in Shakopee Minnesota a few weeks ago and I won first place in the project contest!
If you would like to see this project it is currently on display at Altered Art and Scrap Playground in Rapid City on Main Street next to the journal.


3 comments:
Wow this is fantastic!!
Fabulous altering there! Love the colours and pattern your chose too :)
une autre très bonne idée....
Post a Comment